Structured Query Language (SQL)
In a previous post, we looked at some of the core concepts behind relational databases and how data should be organised to avoid some of the pitfalls of database design such as repetition and redundancy. In this post, we will be looking at how to use Structured Query Language (SQL) to interact with our databases through classic CRUD operations (Create, Update and Delete).
What is Structured Query Language?
The fundamental job of an MS Access database (or indeed any database) is to provide a home (base) for data (data). Hence database. Data is stored in entities which are referred to in MS Access as tables and this ability to store data provides us with an opportunity to read, update, insert and delete said data at a later date. In order to work with the data we have stored, we need to be able to communicate with the database. And in order to communicate with the database, we need to use Structured Query Language (SQL).
SQL provides us with the opportunity to read data from single or even multiple tables. We can use SQL to sum, count or average values stored in the database. SQL can also be used to insert new records, update existing ones and delete unwanted ones. Let’s examine what an SQL statement might look like.
The most basic statement you can write with SQL is called a SELECT statement.
SELECT Invoices.ID, Invoices.InvoiceNo, Invoices.Date, Invoices.OrganisationID FROM Invoices
In the above SQL statement we are retrieving the fields ID, InvoiceNo, Date and OrganisationID from an Invoices table.
Where will I find SQL?
In MS Access, SQL can be found in queries (view a query in SQL View). It can also be used in VBA to construct custom queries to manipulate data (this will be covered later in the post).
Note: In MS Access, every communication with the database uses SQL to some degree although this is not always obvious. When you create a form based off a table, the form is using SQL to communicate with the table but these interactions are buried inside MS Access.
SQL Keywords
When you use SQL to retrieve data, you are creating a query. If you take another look at the Select statement above, you will see that some of the words are in UPPER case (SELECT and FROM). These are called keywords and are fundamental to creating SQL queries.
Note: When writing SQL, it doesn’t matter if you use UPPER or lower case for the keywords. SELECT and select are treated exactly the same. There is, however, a convention to use UPPER case as it is easier to read.
There are many keywords in Structured Query Language. Here is a brief description of some of the more popular ones:
| Keyword | Description |
| SELECT | Used to retrieve data from a table. |
| INSERT | Used to add new rows of data to a table. |
| UPDATE | Used to update existing data in a table. |
| DELETE | Used to remove data from a table. |
| WHERE | Used to filter out certain rows based on some criteria. |
| ORDER BY | Used to return the data rows in a particular order based on one or more columns (fields). |
| JOIN, INNER JOIN & OUTER JOIN | Used to join tables together on primary and foreign key fields. |
| DISTINCT | Used to reduce the number of rows returned based on the uniqueness of a given column (field). |
| UNION | Used to join tables together that have an identical number of columns with identical data types. |
Table 1
The CRUD Operations
It is worth remembering that, the fundamental purpose of a database, is to store and manipulate data. At the very basic level there are four actions that a database is required to perform. These activities are often referred to as CRUD operations. CRUD stands for Create, Read, Update and Delete. In SQL terms, these 4 operations translate to:
- Create = INSERT
- Read = SELECT
- Update = UPDATE
- Delete = DELETE
Let’s expand on the SELECT statement.
SELECT Query
In MS Access, you can create a SQL query by either writing the code directly (SELECT field FROM table) or you can use a special interface to help construct the code for you. This special interface method is known as Query-By-Example. It can be an excellent way to generate SQL code without having to be too adept at writing it. We will begin by showing you how to use the QBE editor.
Open the Teaching Institute Software System Database if you wish to practice creating and modifying queries.
In the ribbon, click Create and then select Query Design, the Query By Example editor will open (double-click on the image to enlarge it).
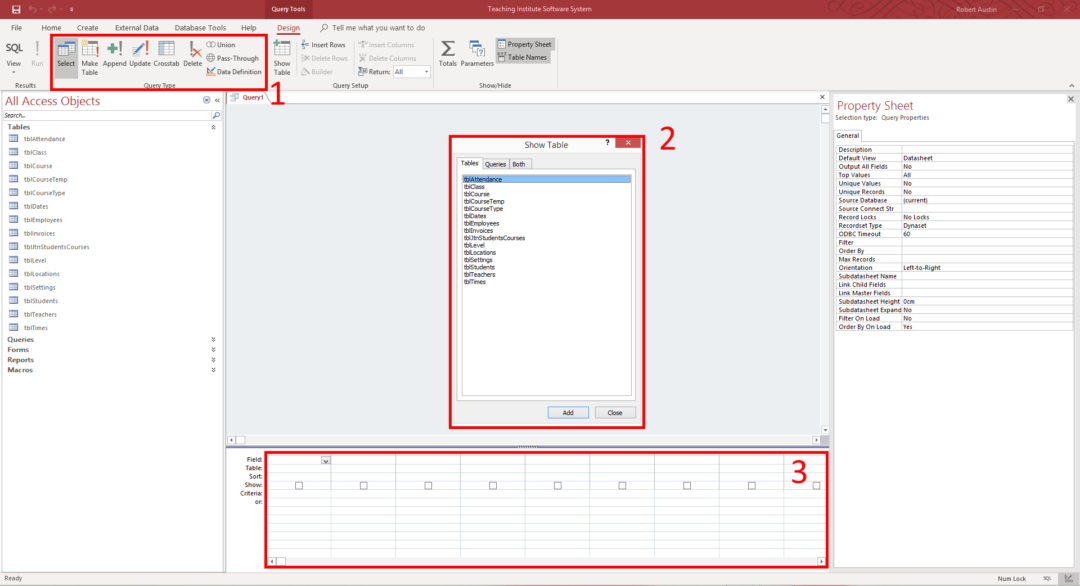
Figure 1
The three areas that have been highlighted are:
- The Query Type button group.
- The Show Table Dialog Box.
- The Query Grid.
We are going to create a simple query that will retrieve the StudentID, First Name, Last Name and Email Address from the tblStudents table.
- In the Show Table Dialog Box, double click tblStudents. You will see tblStudents appear in the query pane (item 1 in Figure 2).
- Close the Show Table Dialog Box.
- Double Click on StudentID, LastName, FirstName and EmailAddress in tblStudents in the newly added tblStudents table. You will see that these fields have been added to the query grid in the bottom half of the window (Item 2 in Figure 2). You can also click and drag the fields from the table to the query pane.
Your screen should now look something like this:
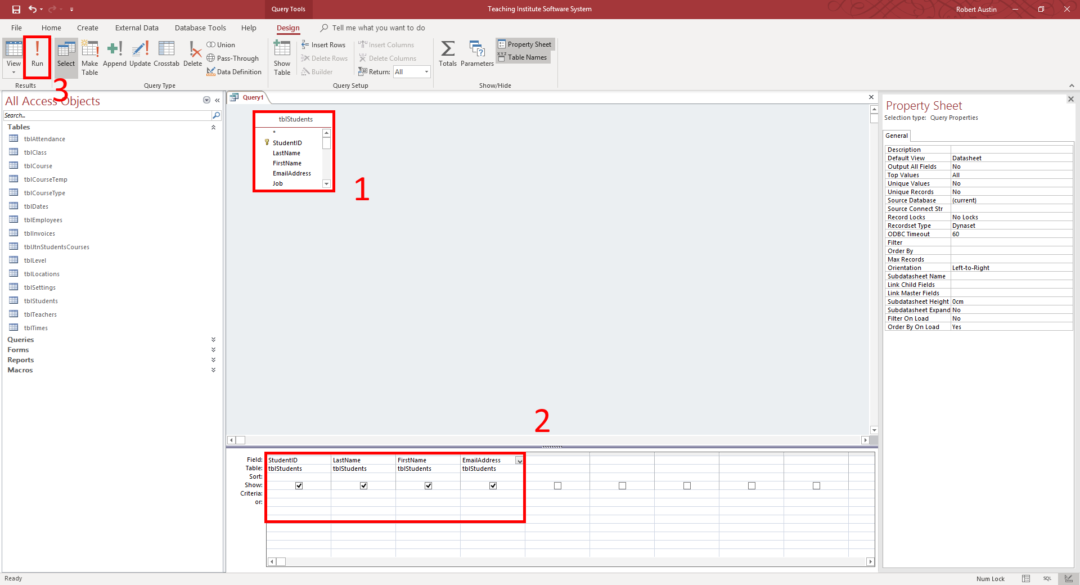
Figure 2
- In the ribbon select Run (Item 3 in Figure 2).
The results of the query are displayed in tabular form.
 Figure 3
So, where is the SQL?
The point of the Query-By-Example editor is to make it simple to create queries in MS Access. What actually happens is that MS Access converts the Query-By-Example objects into SQL. Wouldn’t it be great if you could see the generated SQL? You bet it would!
To view the SQL code:
- Select the down arrow of the view button in the top left hand corner of the screen.
Select SQL view.
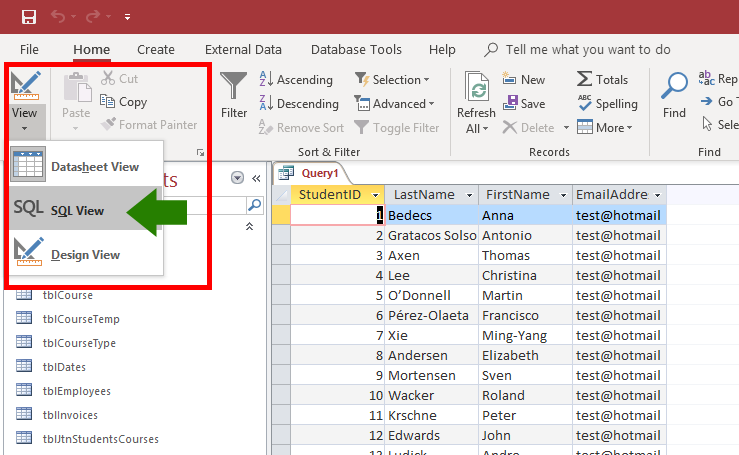
Figure 4
The generated SQL code is shown and reads:

Figure 5
The Query-By-Example editor can be used instead of writing pure SQL which is both more convenient and a useful learning tool.
Summarising the SQL
Let’s summarise some of the details of the SQL statement in Figure 5.
- The SELECT keyword comes first. Then the table fields are referred to explicitly. This means that the fields are prefixed with the table name, and separated by a full stop (tblStudents.StudentID).
- Each of the table fields in the query is separated by a comma.
- The FROM keyword tells the database which table the table fields refer to.
- The end of the SQL command is indicated by the semi-colon (this semi-colon is not necessary when working with single queries).
Altering the SQL directly
In the above example, we began with the query in design mode. We then constructed a query using Query-By-Example before viewing the query as pure SQL. Let’s see what happens if we modify a pure SQL query and then view it using the Query-By-Example editor.
Using the pure SQL from Figure 5:
Place the cursor in the Query text between the tblStudents.EmailAddress field and the FROM keyword. Delete the tblStudents.EmailAddress field and the preceding comma. Your query should now look like this:
igure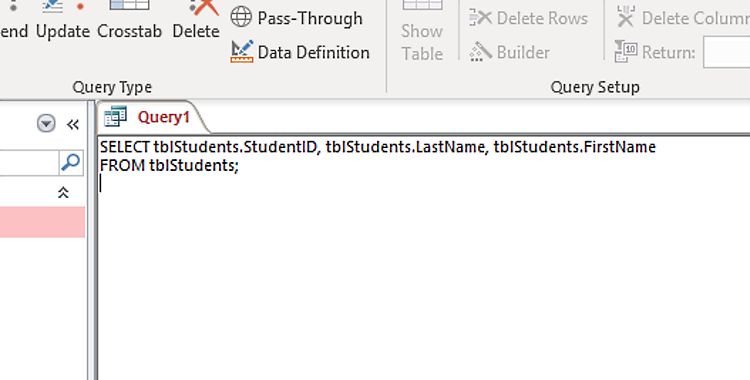 Figure 6
If you now switch to design view (View > Design View) you will see that the tblStudents.EmailAddress field has been removed from the Query Grid.
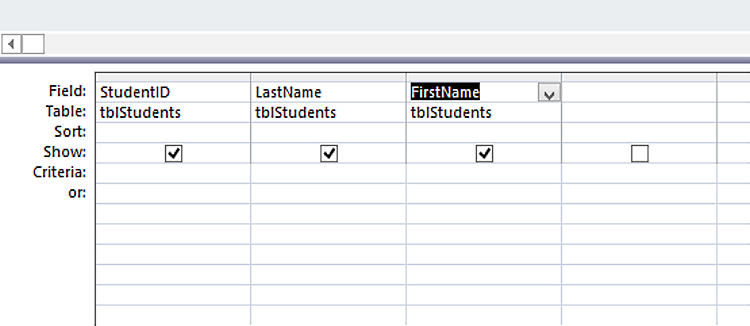 Figure 7
So, you have two options for creating SQL: through the Query-By-Example editor or using pure SQL.
Selecting Records by Criteria
The SELECT query is useful as it provides a simple way to extract data from the database. But we do not always want to retrieve every row from a table. Sometimes, we want to retrieve a subset of rows that match a certain criteria.
For example, we may only want to see records from the tblStudents table where the city is ‘New York’. Or we may only want to return employees from the tblEmployees table that have the job title of ‘Secretary’. These actions are achieved by using the WHERE clause.
- Open the QBE editor, remove any other tables and add the tblStudents table.
- Add StudentID, FirstName, LastName and City to the Query Grid
- In the City column add the text “New York” to the Criteria row and press Enter
Your Query Grid should look like Figure 8:
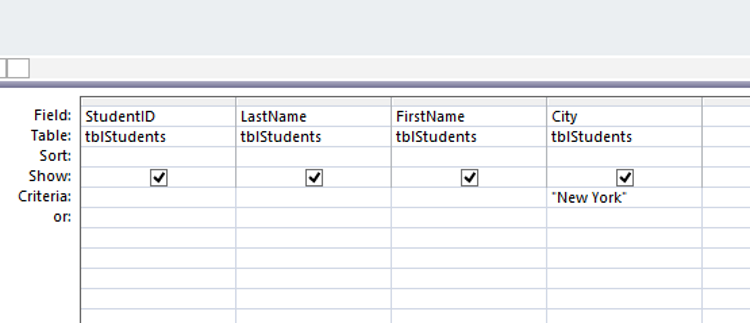
Figure 8
- Run the query and you will see that the only rows returned are those that have ‘New York’ in the city column.
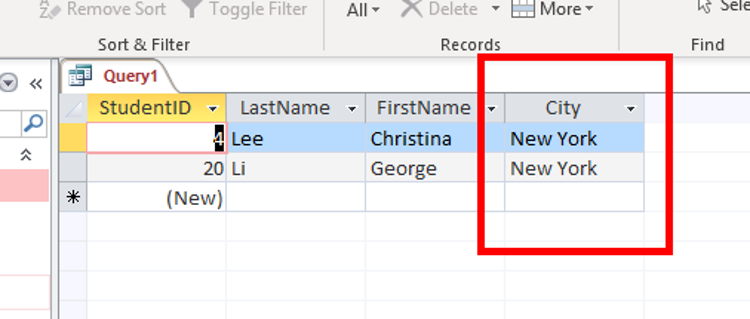 Figure 9
- Now switch to SQL view to see the SQL code for this query:
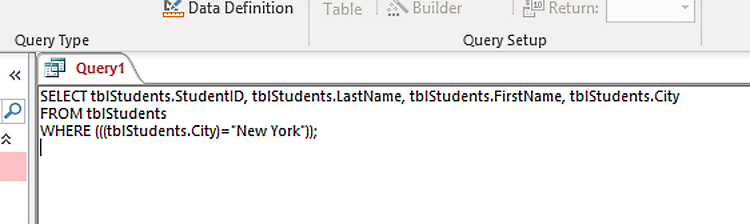 Figure 10
You can see that we have the standard SELECT query but a WHERE clause has been added to filter the records based on the criteria shown.
The WHERE clause comprises of the WHERE keyword followed by the field name tblStudents.City the comparison operator ‘=’ and the literal value that is being searched for “New York”.
You will notice that in converting it from a QBE query to pure SQL, parentheses have been added around the WHERE claus. This particular feature is a small annoyance that MS Access has, in that the parentheses are not necessary (certainly not in a simple query like this). The SQL could just as well read:
SELECT tblStudents.StudentID, tblStudents.LastName, tblStudents.FirstName, tblStudents.City FROM tblStudents WHERE tblStudents.City=”New York”;
The use of the WHERE clause is a very important concept to understand, particularly when using action queries such as UPDATE and DELETE (more on this later).
Comparison Operators
In the WHERE clause we have used a comparison operator (the equals sign). It is often useful to use other comparison operators such as:
- < Less than,
- > Greater than,
- <> Not equal to,
- <= Less than or equal to,
- >= Greater than or equal to.
In the following example, we are using the ‘>’ operator to find all courses that cost more than £119:
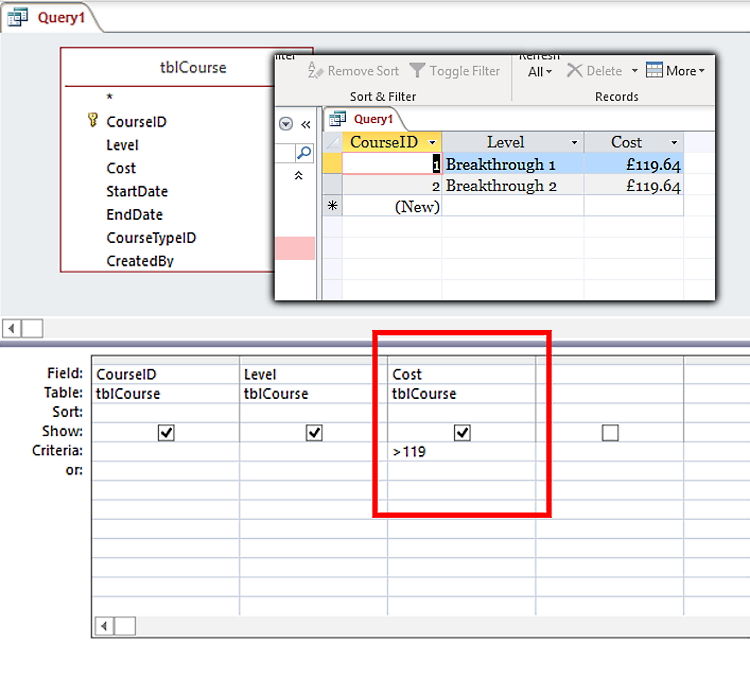 Figure 11
Comparison operators work intuitively with numeric values. When comparing strings, the greater than operator (>) will look for a string that comes after another string alphabetically. So, it is correct to say Dog > Cat (D comes after C) but incorrect to say Duck > Monkey (M does not come after D).
INSERT QUERY
The INSERT query allows us to add new records to the database. It is analogous to the Create function in our CRUD acronym, however, in the QBE window the INSERT query is accessed via the Append button.
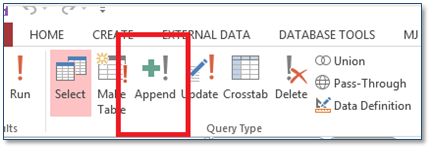 Figure 12
We are going to add a new record to the tblEmployees table using an INSERT action query.
- Open the QBE window and click on the Append button in the ribbon.
- In the append dialog box select tblEmployees:
 Figure 13
- In the query Grid type FName:”Tom” in the first row of the first column.
- Select FirstName from the drop down list in the Append To: row.
- In the query Grid type SName:”Cruise” in the first row of the second column.
- Select LastName from the drop down list in the Append To: row.
- In the query Grid type Job:”Drama Teacher” in the first row of the third column.
- Select Job Title from the drop down list in the Append To: row.
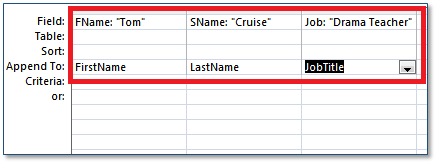
Figure 14
- Click the Run button to execute the query.
- You will get a warning that tells you that you are going to add rows to the table Click OK.
- Open the tblEmployees table and you should see that a new record has been inserted with the data we provided.
- Now switch to SQL view to see the SQL code for this query:
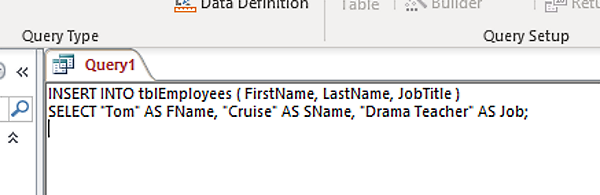 Figure 15
To summarise the query:
- The INSERT keyword is followed by the word INTO, this is followed by the name of the table and the fields that we are inserting.
- The second part of the query uses the SELECT keyword and then combines the literal data (“Tom” for example) with as “alias” (AS FName).
Another quirk of MS Access is the way it converts INSERT statements. Another (more succinct) way of writing the above would be:
INSERT INTO tblEmployees (FirstName, LastName, JobTitle) VALUES (“Tom”, “Cruise”, “Drama Teacher”)
The above statement is a more “standard” way of writing an INSERT statement.
UPDATE Query
An update query is used to change a value of one or more fields in an existing table row or number of rows. In our example, we are going to update some of the details relating to the record we have just added. In order to do this we need to somehow identify the row that contains our record.
To do this
- Open the tblEmployees table (we are starting with a fresh copy of the database so you will not see the previous entry).
- Choose a record to edit (we are going to choose the record for Gabrielle Luna).
- Make a note of the EmployeeID for the Gabrielle Luna record. In our case it is the number 3.
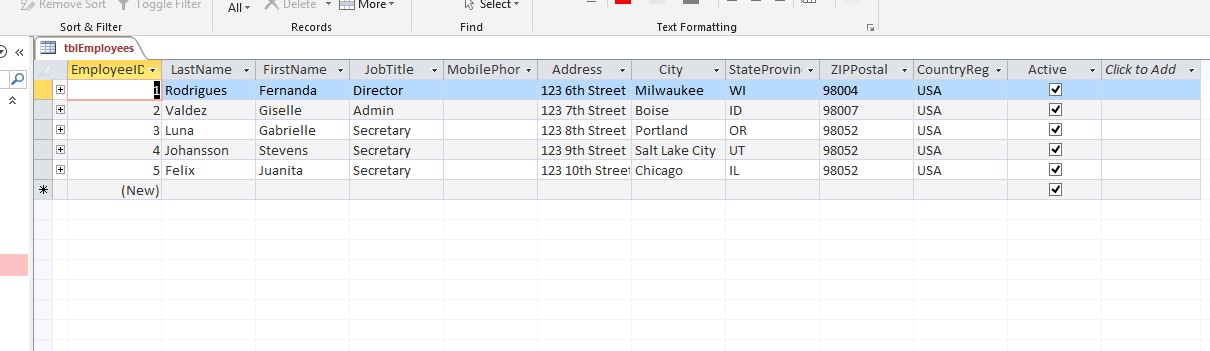 Figure 16
- Close the tblEmployees table.
We are going to use the EmployeeID value with a WHERE clause so that we are certain that we only update the record that we need to.
Note: This is why the WHERE clause is so important. If we run an action query such as UPDATE without specifying a WHERE clause, we will alter every record in the table.
We are going to UPDATE two of the fields in the Gabrielle Luna record; City and StateProvince. To carry out this update we must do the following:
- Open the QBE editor and add the tblEmployees table.
- Click the Update button on the ribbon.
- In the first column of the query grid select EmployeeID.
- In the criteria row enter the ID value that we have just obtained from the tblEmployees table (3).
- In the second column select City
- In the Update To: row, type “Sacremento”.
- In the third column select StateProvince.
- In the Update To: row, type “California”.
The query builder should look like this:
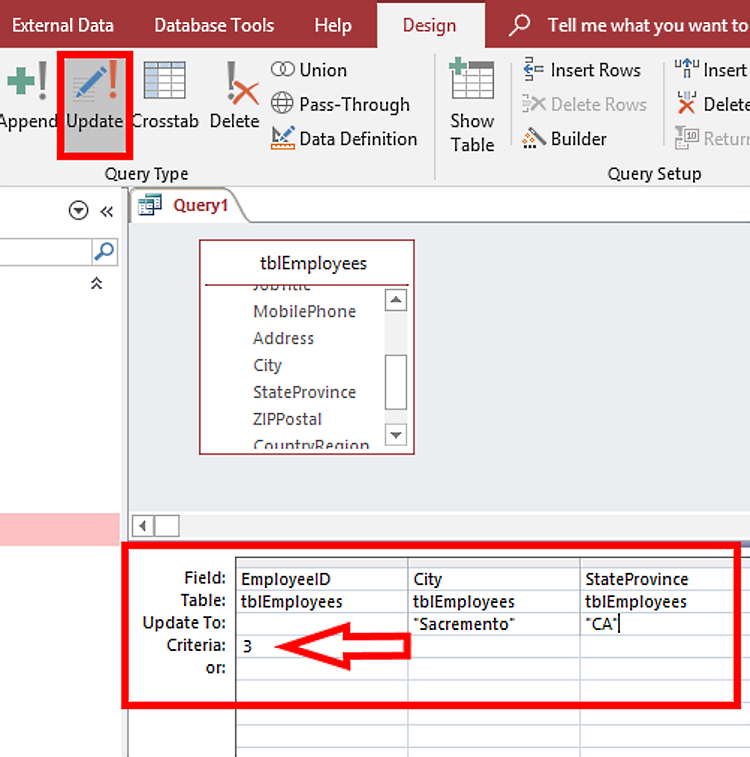
Figure 17
Before we run this query, let’s take a look at the SQL code. Select SQL View:
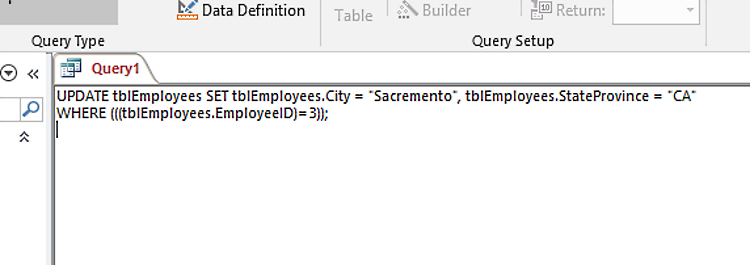 Figure 18
In this command the UPDATE keyword is followed by the table name, the SET clause then tells the database which fields to update and to which value. The WHERE clause comes next and it tells the database to only perform this UPDATE on the row WHERE the EmployeeID = 3.
Run the query and open the tblEmployees table to check that the fields for Gabrielle Luna have been updated.
Note: Again, the parentheses around the WHERE clause are unnecessary.
DELETE Query
The DELETE query is used to delete a record or multiple records from the database.
Note: For obvious reasons, be careful when using a delete query.
We are going to delete the Gabrielle Luna record from the database. But this time we are going to start using the SQL View and check our code in the QBE editor.
- Open the QBE editor, close the ‘Show Table’ dialog.
- Select SQL View.
- The word SELECT; will be shown in the view.
- Remove the word SELECT; and type this: DELETE * FROM tblEmployees WHERE EmployeeID = 3;
- Your query should look like this:
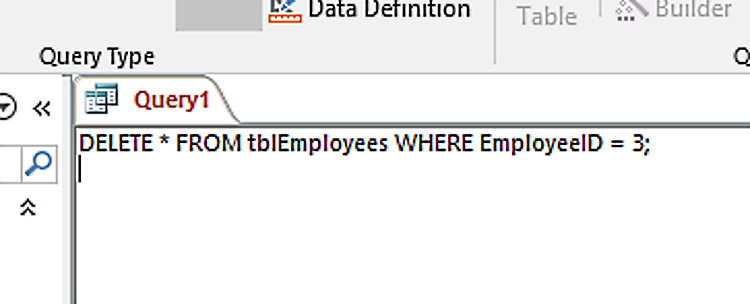 Figure 19
Note: This query has used the asterisk short cut *. The asterisk is used to indicate that all fields should be selected. This can be used in SELECT queries to return all columns. The asterisk is useful but should only be used when it is a definite requirement to return all columns. In all other cases the specific field names should be listed.
- Select Design View.
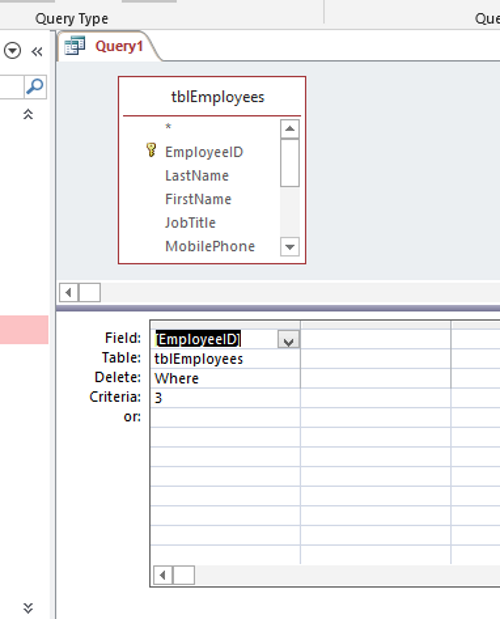 Figure 20
- Click the Run button to execute the query.
- You can check that Gabrielle Luna has been removed from tblEmployees by opening the tblEmployees table.
SELECT DISTINCT
Select distinct is used to return only unique rows of data. Let’s take a look at an example.
- Open the QBE editor.
- Select SQL View.
- Delete SELECT; and type: SELECT tblEmployees.JobTitle FROM tblEmployees;
- Run the query. You will have a list of JobTitles. The JobTitle “Secretary” will be repeated 5 times.
- Select SQL View.
- Add DISTINCT into your query like this: SELECT DISTINCT tblEmployees.JobTitle FROM tblEmployees;
- Run the query. You will now only have unique rows of data (every value will only appear once).
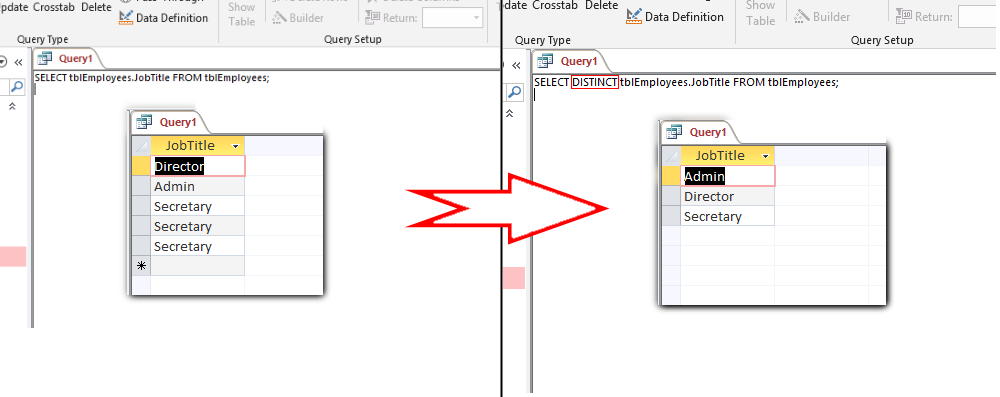 Figure 21
SELECT DISTINCT is a very useful keyword but can only be added to an SQL statement through SQL View. You cannot do it through the QBE editor.
ORDER BY
The ORDER BY clause sorts a query by a field or fields in either ascending or descending order.
- Open the QBE editor.
- Add tblEmployees.
- In the query grid:
- Choose tblEmployees for Table.
- Choose LastName for Field.
- Choose Ascending for Sort.
- This will select the LastName field from tblEmployees and then sort the data by LastName (alphabetically in this case).
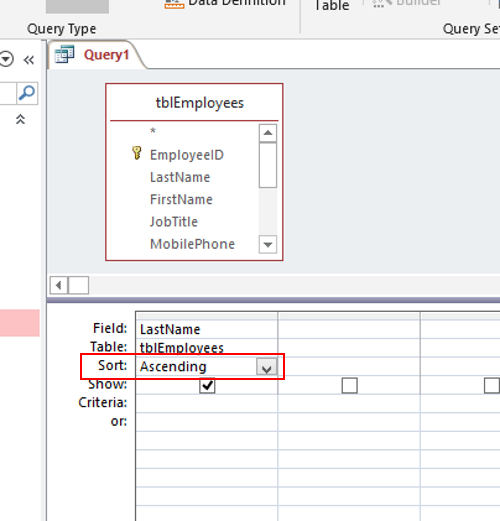 Figure 22
Note: Choosing Descending for the Sort field will reverse the order.
- Change to SQL view.
- The ORDER BY keyword has been added to the end of the SELECT statement.
 Figure 23
- Running the query will return this dataset:
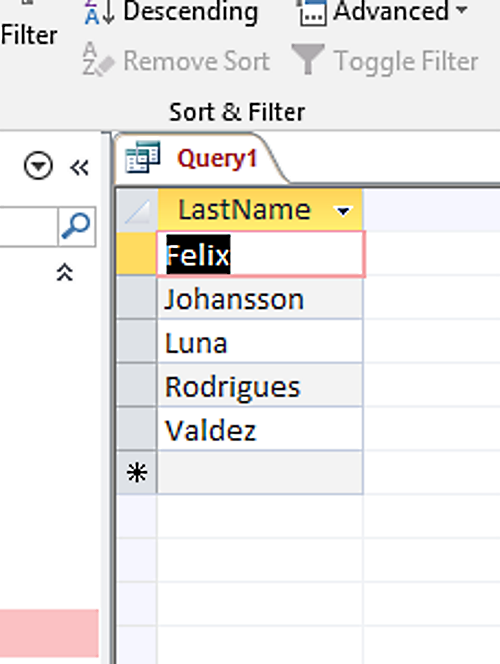
Figure 24
JOINING TABLES
In a normalised database, tables will often contain fields that reference a field from another table. In Figure 25 below, the tblClass table contains a field called TeacherID and TeacherID is “linked” to the TeacherID of the table tblTeachers. This link provides an important protection: no value can be entered into tblClass.TeacherID unless it exists in tblTeachers.TeacherID. This ensures that we have a database that contains data integrity. It also gives us an opportunity to combine the two tables in a query. And the act of combining two or more tables in a query is referred to as “joining” tables.
From a purely SQL code perspective, joins can be difficult to write. But QBE pane provides us (yet again) with a great tool to visualise and learn the concepts of joining tables.
To see how tables are joined together do the following:
- Open the QBE editor.
- Add the tblTeachers table.
- Add the tblClass table.
- The relationship between the table already exists and is depicted by the line that connects them (the line travels from tblTeachers.TeacherID to tblClass.TeacherID).
- Add Teachers.LastName to the grid and then add tblClass.ClassDate.
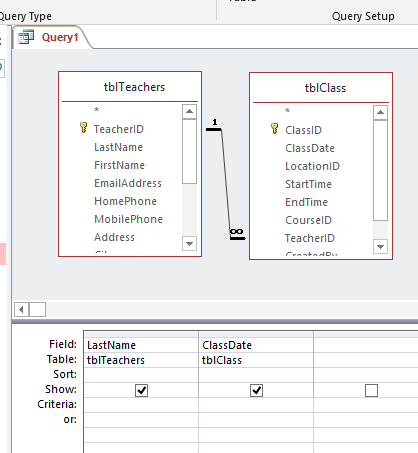
Figure 25
- Run the query.
- Switch to SQL View
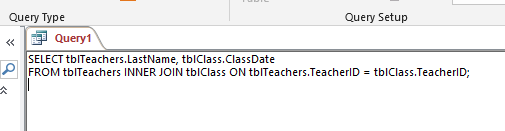
Figure 26
Let’s summarise what we can see:
- We see our normal SELECT query, with the fields explicitly identified by their table name prefix.
- The FROM clause lists the tables that we want to draw the information from.
- The INNER JOIN clause tells the database that we only want to see results where both of the tables contain a value in the TeacherID field.
- The ON keyword tells the database which two fields contain the related data.
Note: The INNER JOIN part of the SQL query was created by the line that joined the tblTeachers.TeacherID field to the tblClass.TeacherID field. We did not need to add anything to the query grid.
If we go back to the QBE editor, we can change the relationship type to include ALL of the records from the tblTeachers table and only matching records in the tblClass table.
To do this:
- Right click on the table join (you have to be very careful to right-click on the line itself) and select Join Properties.
- The Join Properties dialog box appears.
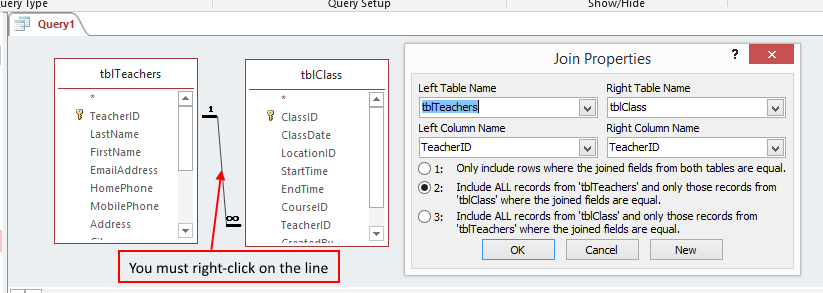
Figure 27
- The dialog box shows the tables that are selected and the columns upon which the join is created. The tables are identified as ‘Left’ and ‘Right’. Below this there is a list of join types.
- Select Option 2: Include all records from ‘tblTeachers and only those records from tblClass where the joined fields are equal.
- Click OK and run the query.
- Switch to SQL View.
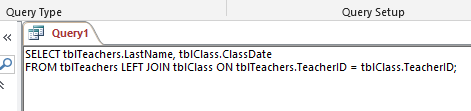
Figure 28
Here we see the SELECT query once again but the keyword LEFT has been added to indicate that ALL records from the ‘Left’ table must be returned. In this case, the “Left” table is tblTeachers. (B.T.W., There is an element of randomness as to the way in which tables are defined as “Left” and “Right”).
The difference between the 2 queries above is small but important. There are 3 teachers recorded in tblTeachers that do not have any classes allocated to them. By looking through the query results I can see that these are teachers named Lee, Xie and Mortensen (look for records with no value in the tblClass.ClassDate field).
Using SQL in VBA code
Writing your own SQL queries in VBA code is a great way to extend the functionality and usability of your database projects.
This part of the tutorial will concentrate on executing queries such as Select, Insert, Update and Delete in VBA code.
You will first need to open the VBA Editor and add a new Module.
- Press ALT + F11 on your keyboard.
- Right-click on TeachingDB.
- Mouse over Insert and click on Module.
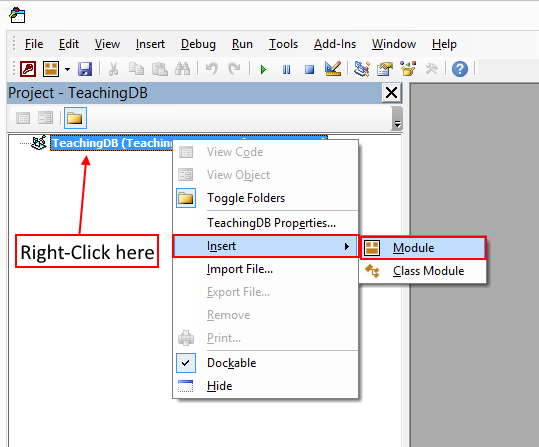
Figure 29
Let’s take a look at our newly created Module:
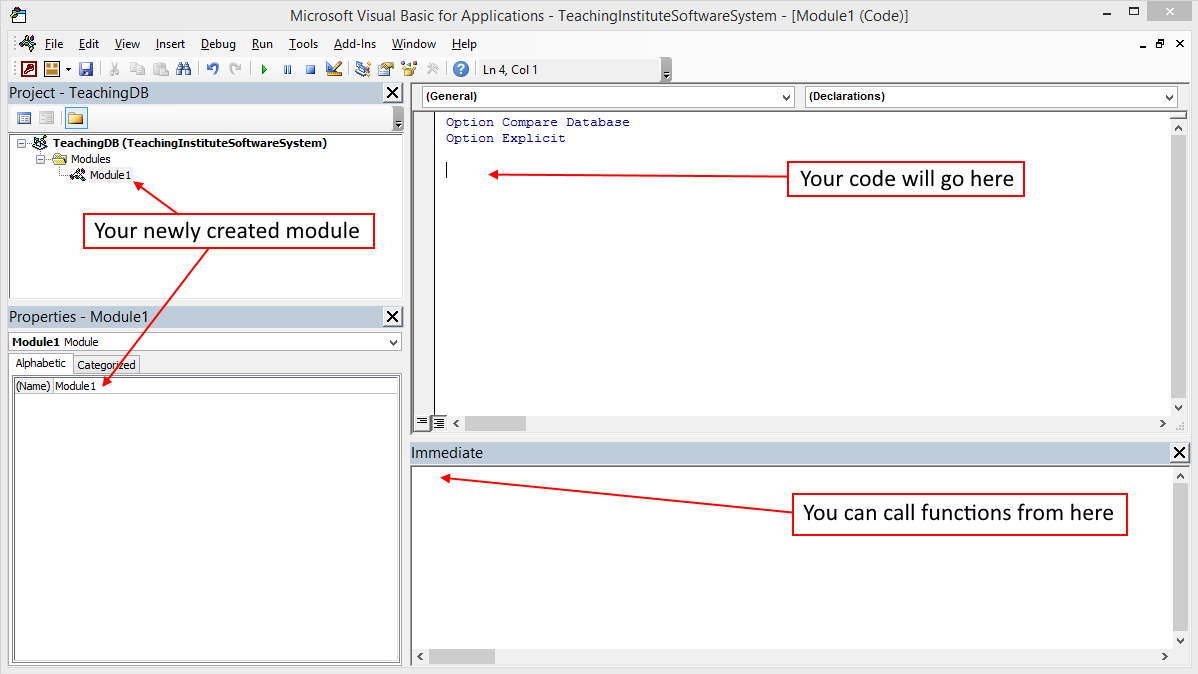
Figure 30
We will be adding code in the section labelled “Your code will go here” (obs).
Selecting Records
The first procedure you will write will be a procedure that uses SQL to select an Employee from the database.
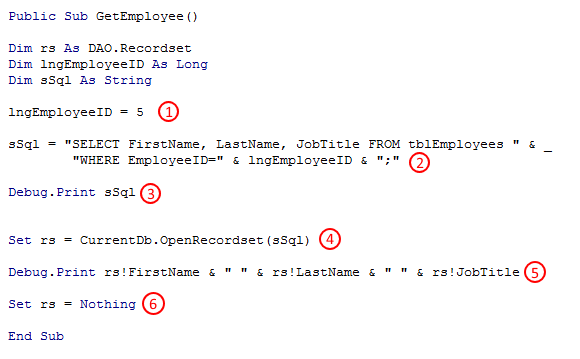
Figure 31
- We set the lngEmployeeID value to 5.
- We create an string that will represent the SQL query that we want to generate.
- We print the string to the Immediate Window so we can evaluate it.
- We open a recordset using the SQL query string we created earlier. A recordset is a dataset that we can interact with.
- We print some values from our recordset to the Immediate Window.
- We set the recordset variable to nothing (a clean-up operation).
To run the code, type GetEmployee into the Immediate Window and press return on your keyboard.

Figure 32
The code will print out the SQL query string (sSql) and some elements from the recordset.

Figure 33
It is very common to use a recordset to work with existing data in an MS Access project. The recordset itself can be edited and records can be updated, created and deleted although there are other, more SQL, ways to achieve this using the CurrentDB.Execute method (show below).
Inserting a Record
Let’s write some code to insert a record in tblEmployees.
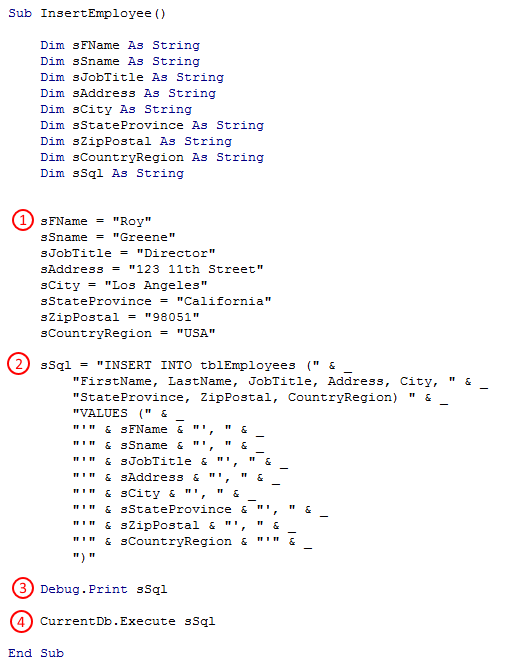
Figure 34
- We use a series of variables to store the values that we will be entering in the table.
- The SQL statement itself is stored in a variable called sSql and is a mix of literal string values and variables.
- We print the SQL statement to the Immediate Window. Although this is unnecessary, it can be useful to view the compiled SQL statement and error check it.
- We use the CurrentDB.Execute statement to run the SQL statement.
To run the code, type InsertEmployee into the Immediate Window and press return on your keyboard. The SQL statement will be printed to the Immediate Window…

Figure 35
…and if you open up tblEmployees, you will see that Roy Greene has been entered as a new Employee:

Figure 36
Updating a Record
We can also use the CurrentDB.Execute method to update existing record(s) in a table.
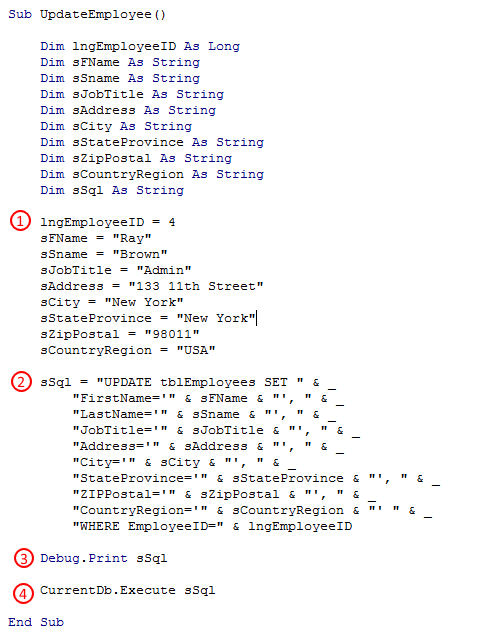
Figure 37
- We use a series of variables to store the values that we will be entering in the table.
- The SQL statement itself is stored in a variable called sSql and is a mix of literal string values and variables.
- We print the SQL statement to the Immediate Window. Although this is unnecessary, it can be useful to view the compiled SQL statement and error check it.
- We use the CurrentDB.Execute statement to run the SQL statement.
To run the code, type UpdateEmployee into the Immediate Window and press return on your keyboard. The SQL statement will be printed to the Immediate Window…

Figure 38
…and if you open up tblEmployees, you will see that EmployeeID 4 has been updated with the appropriate values.

Figure 39
Deleting a Record
Let’s use the CurrentDB.Execute method to delete an existing record in tblEmployees.
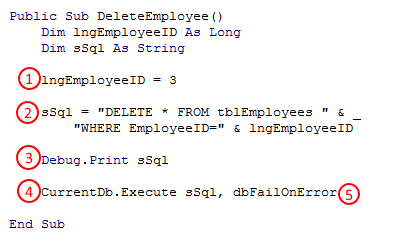
Figure 40
- In this instance, we only need the EmployeeID of the record we want to delete.
- The SQL statement itself is stored in a variable called sSql and is a mix of literal string values and variables.
- We print the SQL statement to the Immediate Window. Although this is unnecessary, it can be useful to view the compiled SQL statement and error check it.
- We use the CurrentDB.Execute statement to run the SQL statement.
- We have introduced the dbFailOnError option to the CurrentDB.Execute statement. This is an important statement because if the code can’t run for some reason (as we will see), without this option we would not receive a message indicating the reason why not.
To run the code, type DeleteEmployee into the Immediate Window and press return on your keyboard. The SQL statement will be printed to the Immediate Window…
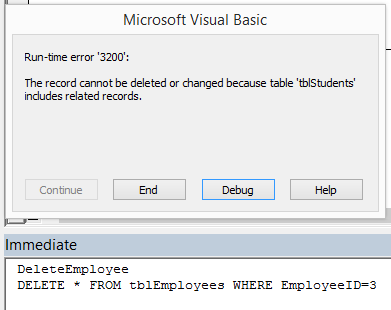
Figure 41
In Figure 41, we can see that after running the DeleteEmployee sub-procedure, we print the SQL statement to the Immediate Window (as expected) but the CurrentDB.Execute method throws an error. We are unable to delete EmployeeID 3 because EmployeeID 3 appears in tblStudents as a related record. Since we cannot create orphaned records in a well-designed relational database, this behaviour is both expected and welcome.
If we had not used the dbFailOnError option, we would not receive this message. The query would not run and the record would not get deleted but we would be unaware of this.
Summary
Let’s summarise some of the points we have covered in this post.
Structured Query Language is a language that enables objects to communicate with a database.
Some popular commands that SQL uses are SELECT (to retrieve records), INSERT (to create records), UPDATE (to update records) and DELETE (to delete) records.
When selecting records, it is possible to filter records using the WHERE keyword and sort records using the ORDER BY keyword.
MS Access provides two ways to write queries: using the Query-By-Example editor or by using pure SQL code.
You can use SQL in VBA by using a combination of string literals and variables to construct SQL statements that can be executed using the CurrentDB.Execute method.
Understanding SQL is an important step in understanding relational databases themselves. A good understanding of SQL will also enable you to migrate your application to a SQL Server back-end which is a popular and robust solution for thousands of businesses.